# Office & Users
As a new user it's highly recommended to read this document from top down.
An office is a logical grouping of extensions. This group has it's own areacode, timezone, outbound caller ID, and music on hold.
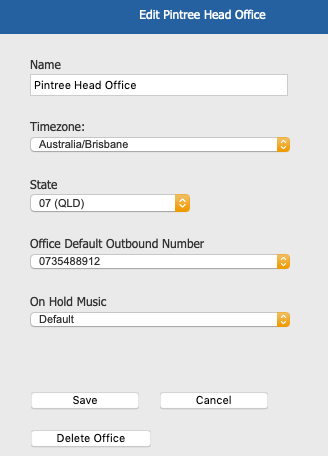
# Create or Modify an Office
From the PBX homepage, click 'Offices & Users'. 
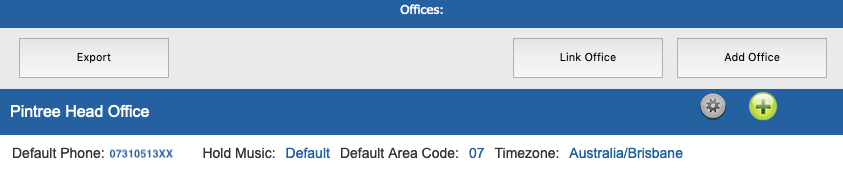
On this screen you can quickly see the relevant information about each 'office':
- Default Phone: This is the default outbound caller ID that each extension part of this office will use. (Unless otherwise specified).
- Hold Music: This is the hold music that will be played in the even you place someone on hold. (Note: This is specific to outbound calls only.) Click here for more information about Music on Hold.
- Default Area Code: This is the default area code that will be used when an extension part of this office does not specify one when making a call.
- Timezone: This affects the clock shown on the handsets.
You can click the 'Add Office' button to create another Office or modify the Office by clicking the  button.
# Create or Modify an Extension
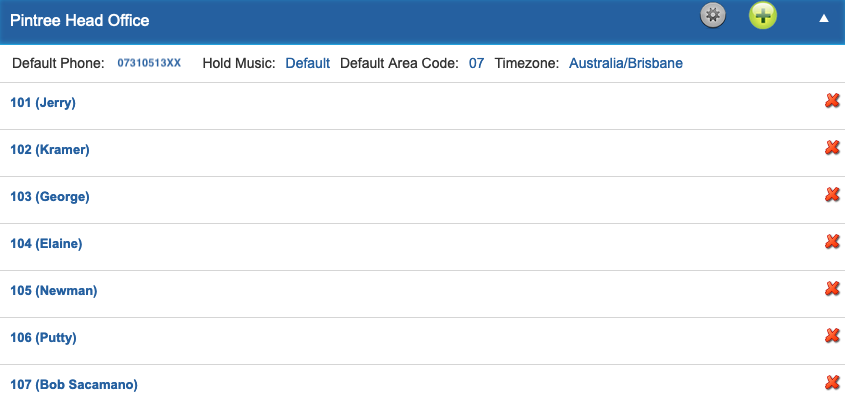
Select the office you wish to view / edit by clicking on the blue bar with the name of the office.
Here you can see each extension that has been added, along with their extension number.
- To Add a new extension, click the green
 button.
 - To Delete an extesion, click the
 button.
 - To Modify an extension, click on the 'Extension Name'.
When configuring an extension there are a lot of options available, however the minimum settings needed are contained with the 'General' section.
# General Settings
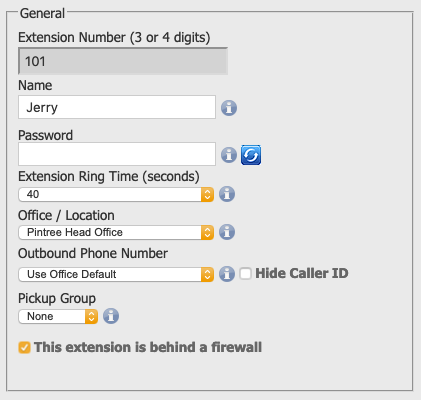
Assign the extension a 3 OR 4 digit extension number and a 'Name'.
You can use the password provied, or press  button.
By default the 'Extension Ring Time' is set to 40, however you can adjust this in increments of 5 seconds to a total of 60.
Note: The 'Extension Ring Time' configured here is only relevant when the extension is dialled directly and not part of a group of other phones.
Select the 'Office' to assign this user to.
Next you can either use the office default for your 'Outbound Phone Number' or you can specify a different number.
Specify the 'Pickup Group' you wish to place the extension in. (Place all your users in the same pickup group so that you can retrieve a call ringing on another user's phone)
Make sure that you leave 'This extension is behind a firewall' remains enabled.
# Autoprovision
Allows myCloudPBX to automatically generates the handset configuration for your phones.
Click here for more information about AutoProvisioning handsets.
# Enable Direct Dialling
Enable 'Direct Dialling' to configure a direct line for this extension.
# Personal Voicemail
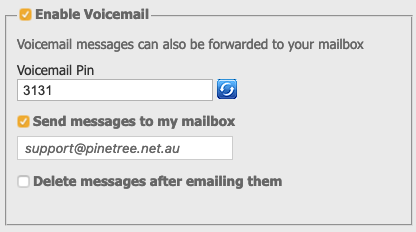
Here you can set your 'Voicemail PIN', or press button to reset.
You can also click 'Send messages to my mailbox' and the PBX will email you a copy of the voicemail recording (in .wav format).
Optionally you can click 'Delete messages after emailing them'. This will disable the red voicemail indicator light on your handset.
# Callback Feature
This feature allows you to receive a callback from an internal extension when the user you are calling is busy.
If you are already on a call and someone attempts to call you, the PBX will greet them with the following options.
- Leave a voicemail.
- Register a callback.
Should they choose to register a callback request, the next time both of your phones are available, they will both ring and you will be talking to each other.
Note: This feature is only available for internal calls.
# Smart Calling
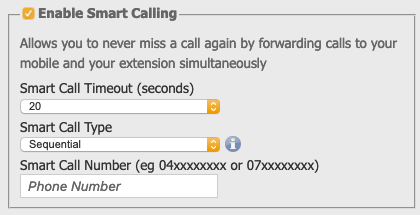
Smart calling allows you to automatically forward calls to your mobile & your extension simultaneously.
You can specify the timeout in increments of 5 seconds all the way to 60 seconds.
You can also specify the 'Smart Call Type':
- Sequential: Will ring your handset, before ringing your mobile (both phones will not ring at the same time).
- Parallel: Will ring both your handset & your mobile at the same time.
- Parallel Delayed: Will ring your handset first, and then continue to ring on the handset and your mobile phone.
# Call Diversions

Call diversions are similar to Smart Calling, but not the same.
Call diversion will simply divert your extension to another number without the smarts.
You can choose to either 'divert all calls' or 'divert calls on no answer'.
# Security Features
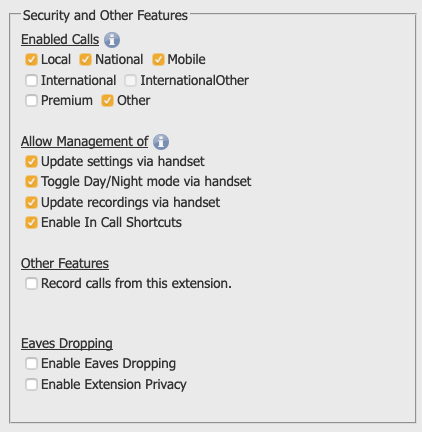
As you enable more of the Hosted PBX's functionality you will find more security features become available.
# Enabled Calls
By default, PBX users can make local, national, mobile, and 13/1300/1800 calls.
You can optionally enable International, InternationalOther and Premium numbers.
- International: Top 20 International destinations.
- International Other: All other supported destinations.
# Allow Management Of
- Update settings via handset: Allows the user to update settings via the handset.
- Toggle Day/Night mode via handset: Allows the user to transition the state of the offices Day/Night conditions from open to closed.
- Update recordings via handset: Allows the user to record system sounds from this handset.
- Enable In Call Shortcuts: Allows the user to activate in call shortcuts.
# Other Features
Tick 'Record calls from this extension' to record all outbound calls made by this extension.
If you wish to record inbound calls as well, you will need to enable call recordings on the inbound phone number in 'Call Routing'.
Click here for more information about Call Recordings.
# Eavesdropping
Here you can enable both the ability to use the 'eavesdropping' feature, and also 'eavesdropping privacy'.
Click here for more information about Eavesdropping.
# Save Changes
When you have finished making changes you need to scroll to the bottom of the page and click 'Save & Close'.
This will save the changes, however you will also need to apply these changes to put them into affect immediately.

Finally, you will need to click 'Apply Changes'.
Once the changes have finished applying (The yellow bar will be gone) your changes are now live.
# Apply Changes to the Handsets
Finally, in the event that you have made changes that affect the 'Line Keys' on a handset, you will need to either Restart or Resync that handset.
In order to resync the handset, you will need to go back to the PBX homepage.
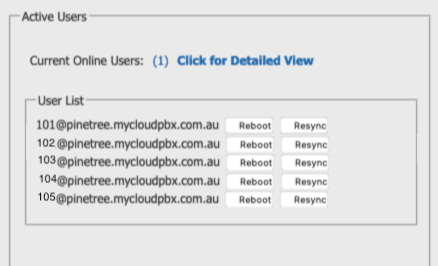
On the homepage, you will see a list of Active Users shown below the two main rows of icons on the left hand side.
Here you have three options:
- Click for Detailed View: This will show you detailed information about the registration status of each extension including the WAN IP Address, SIP Transport, and PING time.
- Reboot: This will remotely reboot each phone immediately.
- Resync: This option is a bit smarter than reboot, as it will wait until the handset is not in use before rebooting and updating any configuration as needed.