# AutoProvisioning Handsets
Your Hosted PBX includes the ability to autoprovision handsets. No longer do you need to log into the web interface of each handset and manually update each phone as it can all be done via the Hosted PBX Management Portal.
Autoprovisioning will automatically generate the handset configuration for you.
Note: This guide assumes you have already created an extension. If not, please follow this guide first.
# Basic Autoprovisioning
From within the Extension Configuration Page, scroll down until you reach the 'AutoProvision' section and enable it.
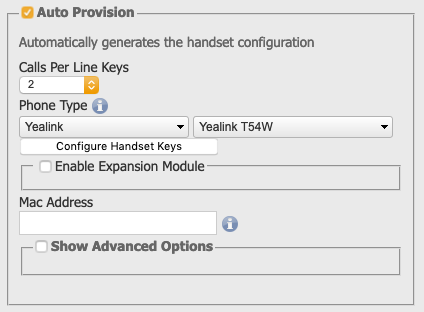
Enter the following information:
- Calls Per Line Keys: This specifies the maximum number of calls, per line key that you wish to accept on your handset at any one time. (If unsure, leave this on the default: 2).
- Phone Type: Select the Make and Model that matches your handset.
- If you have an Expansion Module enter that information as well.
- Finally, add the MAC Address of the handset into the space specified.
# Editing Handset Keys
If you wish to customise any additional keys on your handset, click 'Configure Handset Keys'.
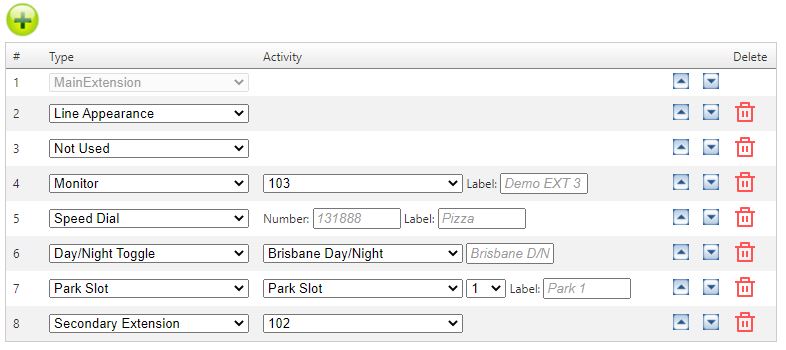
To Add a new linekey, click the green  button.
To Delete a linekey, click the red  button.
There are a variety of linekey types available:
- Line Appearance: This is simply a second line for your extension. Helpful when you take a large number of calls.
- Not Used: This is a blank space. Helpful to keep your handset looking neat and easy to ready.
- Speed Dial: This adds a speeddial key to the handset. Something you dial frequently.
- Monitor: This is just like a speedial, but for internal extensions. Will turn solid RED when they are on the phone, and flash RED when their handset is ringing.
- Day/Night Toggle: This allows you to toggle your inbound number from Daytime to After Hours Mode. Will show as GREEN during the 'Day' and RED outside of office hours.
- Park Slot: This adds a button to allow you to quickly park a call to a particular park slot, you can also easily see if there is a call waiting in that park slot and pick up the call. Will show as GREEN if the park slot is free and RED if there is a call in the park slot.
- Secondary Extension: This allows you to add a secondary extension you can dial out or receive calls from.
Click 'Save' when finished.
# Advanced Autoprovisioning
Enable 'Advanced Options' to access the advanced settings.
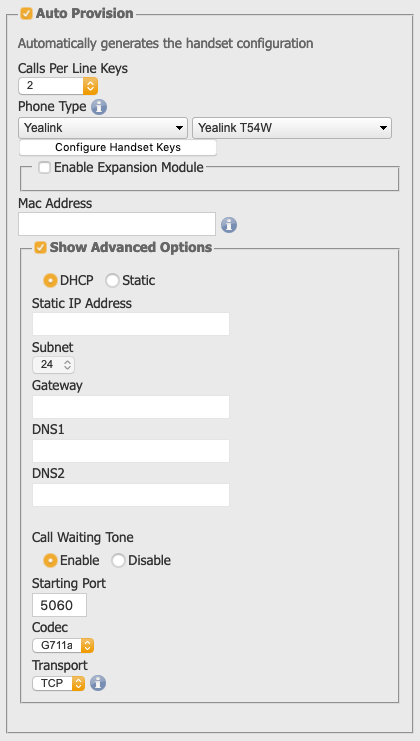
Here you can choose between DHCP or a Static IP Address.
Note: Changes here may cause your phone to go offline when configured incorrectly.
Call Waiting Tone: Use this option to enable or disable the call waiting tone.
Starting Port: Helpful with NAT issues. Using this option will configure the handset to use a different starting port on the local network.
Codec: Choose between G711a (Recommended), and G729a.
Transport: Choose between UDP or TCP for SIP Transport.
# Save Changes
When you have finished making changes you need to scroll to the bottom of the page and click 'Save & Close'.
This will save the changes, however you will also need to apply these changes to put them into affect immediately.

Finally, you will need to click 'Apply Changes'.
Once the changes have finished applying (The yellow bar will be gone) your changes are now live.
# Apply Changes to the Handsets
Finally, in the event that you have made changes that affect the 'Line Keys' on a handset, you will need to either Restart or Resync that handset.
In order to resync the handset, you will need to go back to the Hosted PBX homepage.
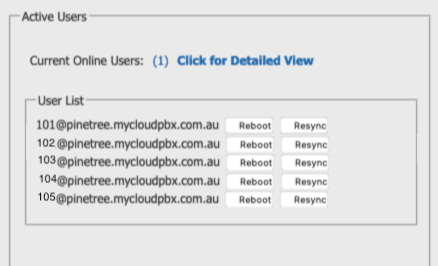
On the homepage, you will see a list of Active Users shown below the two main rows of icons on the left hand side.
Here you have three options:
- Click for Detailed View: This will show you detailed information about the registration status of each extension including the WAN IP Address, SIP Transport, and PING time.
- Reboot: This will remotely reboot each phone immediately.
- Resync: This option is a bit smarter than reboot, as it will wait until the handset is not in use before rebooting and updating any configuration as needed.