# Announcements
An 'Announcement' allows you to play a pre-recorded sound before passing the call onto another activity.
In order to make use of the announcements feature, you will first have to create and upload your sound file.
# Create an Announcement
From the Hosted PBX homepage, click 'Announcements'. ![]()

On this page you will see the following information at a glance:
- Name: This is the name you have assigned to the Announcement.
- Recording Name: This is the name you have assigned to the recorded sound.
- Next Activity Type: This is the next action that the Hosted PBX will perform after playing the soundfile.
- Next Activity Value: This is the name of the next action.
Pro Tip: Try to name the recording and the announcement the same so that you can easily match them together.
Click 'Delete' to delete an item.
Click 'View/Edit' to modify an item.
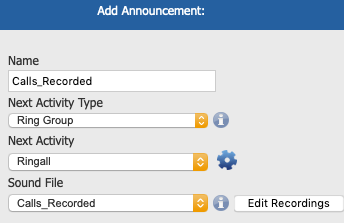
Enter the following information:
Name: Name your announcement. This is for your reference only.
Next Activity Type: Choose from the following options:
External Phone Number: Landline or mobile number, etc.
Hangup
Advanced Day/Night Control: Useful to manage your office hours.
Conference: A fully functional conference bridge.
Extension: Send the call directly to a specific extension.
Ring Group: Send the call to a group of phones.
Voicemail: Send the call to voicemail.
Next Activity: Choose from the available options pre-configured.
Sound File: Select the recording you wish to play.
When finished, Click 'Save'.
This will save the changes, however you will also need to apply these changes to put them into affect immediately.

Finally, you will need to click 'Apply Changes'.
Once the changes have finished applying (The yellow bar will be gone) your changes are now live.