# Day / Night Conditions
A 'Day / Night' condition allows you to leverage the PBX to automate your office hours. Simply specify your office hours, set your 'Day' and 'Night' actions and you're done.
# Overview
From the Hosted PBX homepage, click 'Day/Night'. ![]()

On this page you will see an overview of each configured Day/Night Condition:
- Name: This is for your reference.
- Day: This is the actions the PBX will take during the hours you designate as 'Day'.
- Night: This is the actions the PBX will take during the hours you designate as 'Night'.
- Toggle: Dial this code from your handset to manually toggle the condition from 'day' to 'night' and back.
# Configuration
Click 'Add Condition'.
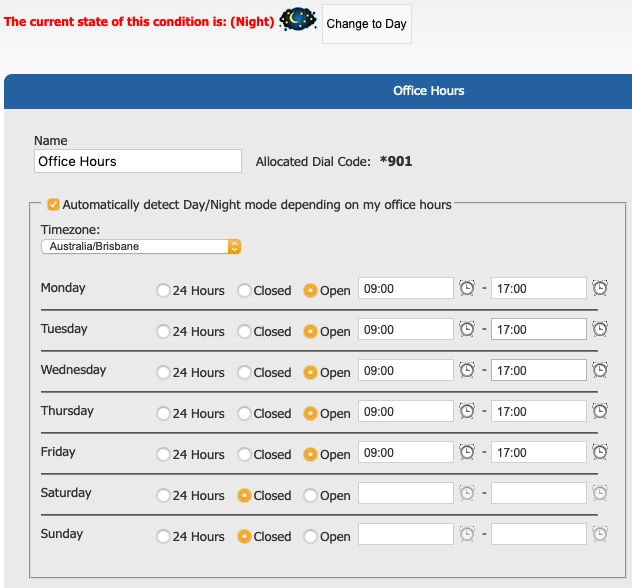
Note: If you are modifying an existing condition you will see the status of the condition in RED at the top of the page.
You can click the 'Change to' button to toggle the condition from within the Hosted PBX screen.
You can also dial the 'Allocated Dial Code' shown a bit lower from a handset to toggle manually.
First you will need to assign the condition a Name. It is highly recommended that you name this something meaningul.
Take note of the Allocated Dial Code for later.
If you wish to allow Hosted PBX to manage your office hours (recommended) click 'Automatically detect Day/Night mode depending on my office hours'.
Set your timezone.
Use the date / time picker to set your office hours as shown above.

Again you will see the above the star code that has been allocated.
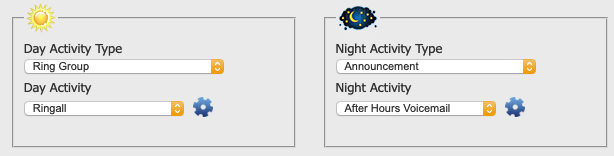
Finally, you will be asked to configure the your 'day' and your 'night' activies.
For both Day and Night, configure the following:
Activity Type:
Next Activity Type: Choose from the following options:
External Phone Number: Landline or mobile number, etc.
Advanced Day/Night Control: Useful to manage your office hours.
Conference: A fully functional conference bridge.
Extension: Send the call directly to a specific extension.
Ring Group: Send the call to a group of phones.
Voicemail: Send the call to voicemail.
Hangup
Next Activity: Choose from the available options pre-configured.
When finished, Click 'Save'.
This will save the changes, however you will also need to apply these changes to put them into affect immediately.

Finally, you will need to click 'Apply Changes'.
Once the changes have finished applying (The yellow bar will be gone) your changes are now live.