# Services
# How to create a Simple Service
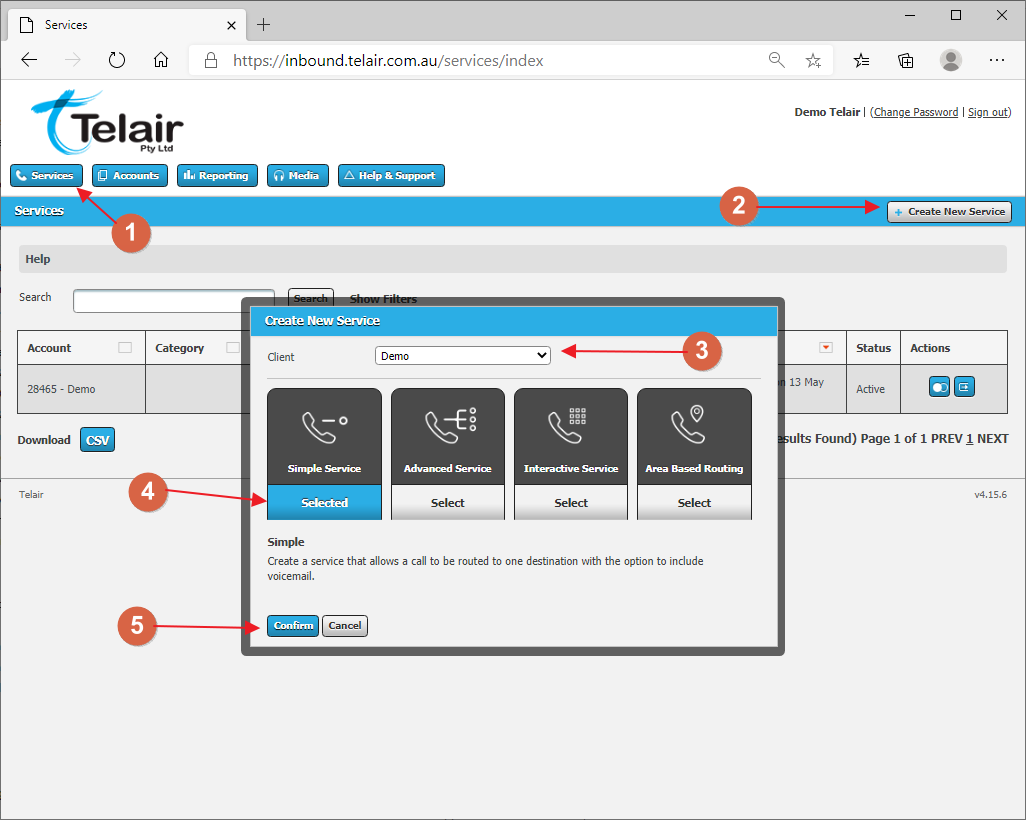
- If you have just logged in, you should already be presented with the Services page. However, if this is not the case, click on the Services button from the main navigation.
- Click on the Create New Service button, which is located on the right hand side of the Services bar.
- From the Create New Service pop-up select the account you wish to create the Simple Service for (from the drop-down menu).
- Select the Simple option, if it's not already selected.
- Click on the Confirm button.
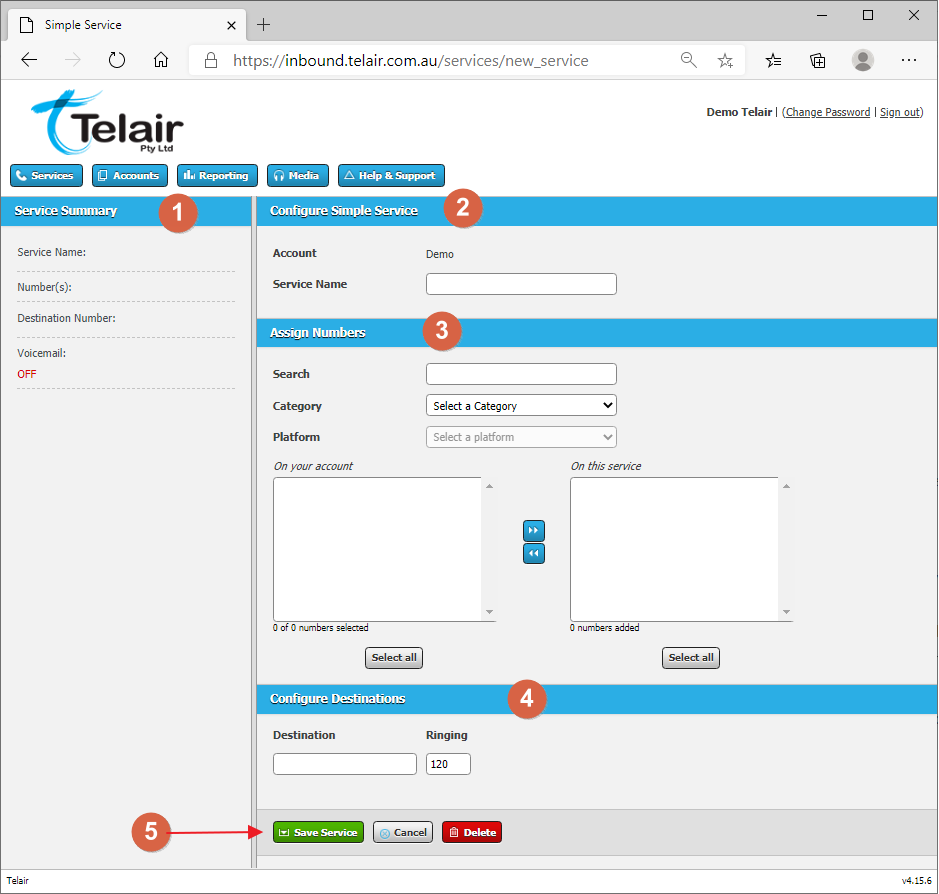
You will now be presented with the Simple Service configuration page, which can be used to tailor your requirements in detail.
- Service Summary - This area displays all currently active settings.
- Configure Simple Service - To begin, give the service a name, as it will be used for identification purposes.
- Assign Numbers - Next, attach one or more DDI numbers to the service. Included is a feature which allows you to find a number and to filter by its category.
- Configure Destinations - You must now enter a destination number to which the attached DDI number(s) will be routed. If your SIP licence is active, you can change the destination type to SIP, if required, and enter a valid IP address to terminate calls to. You can assign this IP address an Alias.
Tip: The Simple Service allows you to setup a Voicemail facility. For more information about its configuration, please refer to Extras - Voicemail.
- Save - this will save all changes to the current config.
Cancel - this will cancel all changes to the current config.
Delete - this will delete and close down the service.
- Once you have configured your Simple Service and clicked on the Save button, you will be presented with a Service Summary Confirmation page. If you are satisfied that the service configuration is correct, click 'Confirm Service' and it will be made live.
# How to create an Advanced Service
- If you have just logged in, you should already be presented with the Services page. However, if this is not the case, click on the Services button from the main navigation.
- Click on the Create New Service button, which is located on the right hand side of the Services bar.
- From the Create New Service pop-up select the account you wish to create the Advanced Service for (from the drop-down menu).
- Select the Advanced option.
- Click on the Confirm button.
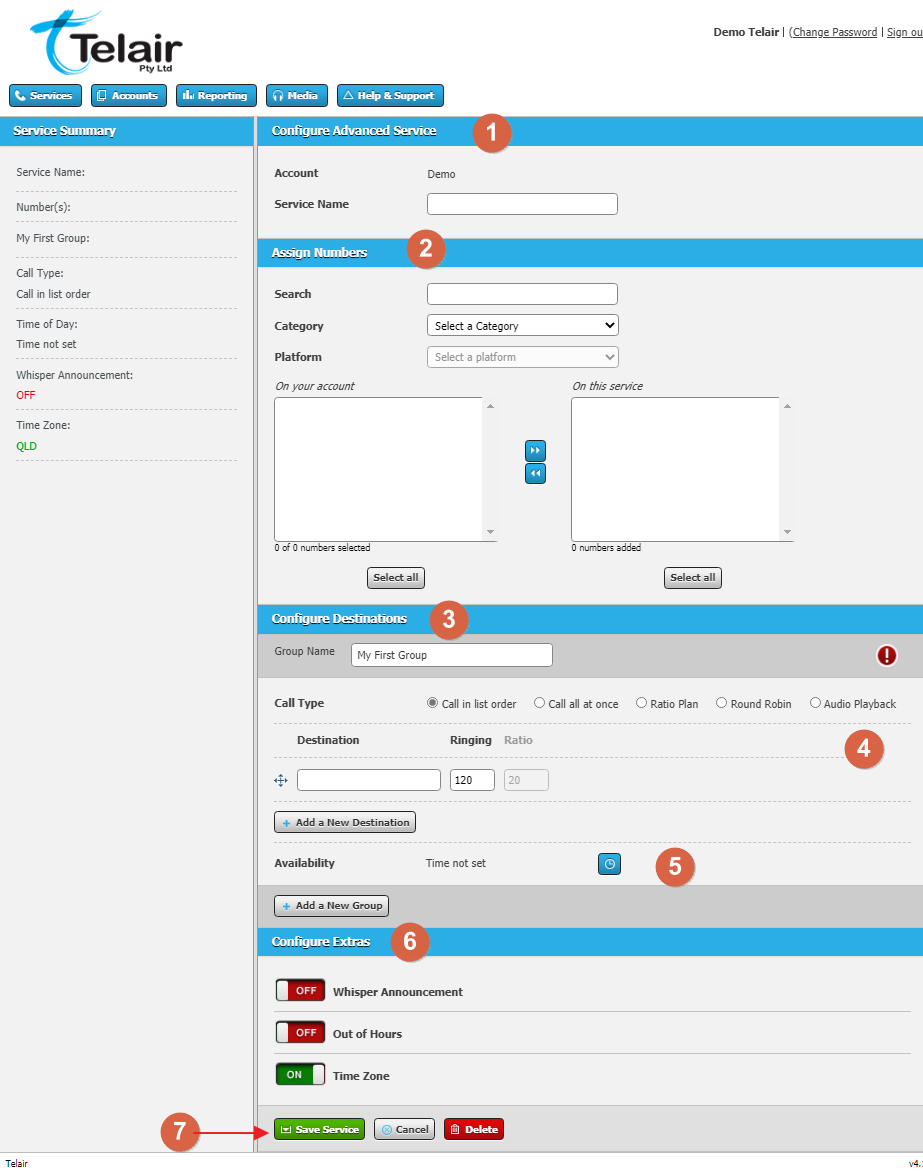
- You will now be presented with the Advanced Service configuration page, which can be used to tailor your requirements in detail.
Configure Advanced Service - To begin, give the service a name, as it will be used for identification purposes.
Assign Numbers - Next, attach one or more DDI numbers to the service. Included is a feature which allows you to find a number and to filter by its category.
Configure Destinations (Business Hours) -
You must now enter a name for the group, as this too will be used for identification purposes.
Select a Call Type - this will determine how calls will be routed through the DDI number(s) / SIP termination address to the destination number(s):
Call in list order
If you have more than one destination number, all calls will be routed to the first number in the list, then the second and so on. To change the list order of numerous destinations, simply click and drag them into position.
Call all at once
This option will route all calls to all destinations simultaneously.
Ratio plan
This option allows for a certain percentage of all calls to be directed to a destination number. For example, if a destination number has a ratio set at 10 (percent), one in ten calls will be routed to it.
Round robin
This option will route the first call to the first destination, which if unanswered, will be routed to the second destination. However, the second call will not be routed to the first destination (as it would with Call in list order), but to the second. The same is true of the third, forth and so on.
Audio playback
This allows you to select or upload a new audio which will be heard by the caller if they enter into this call group.
Destination - You must now enter one or more destination numbers. Each destination has a ringing time value (measured in seconds), which can be changed to your preference.
Availability - Setting the Time of Day is optional. It allows you to choose which days, and for how long the service is available. To configure this, click on the Clock button and a pop-up will appear.
Configure Extras - Once you have configured your destinations, you must choose and configure any extras to be associated with the service. For more information on how to configure these, please refer to their individual sections.
Once you have configured your Advanced Service and clicked on the Save button, you will be presented with a Service Summary Confirmation page. If you are satisfied that the service configuration is correct, click 'Confirm Service' and it will be made live.